
Contributing with pull requests
Last updated on 2026-10-21 | Edit this page
Overview
Questions
- How can I suggest changes to a project on Codeberg?
- How can changes be reviewed before they become part of a project?
Objectives
- apply a fork, a branch and a pull request to contribute changes to another person’s repository
- apply closing keywords to link a pull request to an issue
- analyse proposed changes collaboratively in a pull request review
- explain basic concepts of access control using the example of repository permissions
Pull requests and merge requests
In the previous episode, we used an issue to suggest a change to our partner’s repository. In this episode, we make the change ourselves and propose it to our partner with a pull request, link the pull request to the issue, and go through a review before the changes are merged. We do all of this in the Codeberg web interface.
A pull request asks the owner of a repository to pull changes from another branch (often in a fork) into their repository. Other platforms use different names for the same thing: on GitLab, it is called a merge request.
Our goal is to solve the issue “Add a list of contributors” that we
opened in our partner’s repository in the previous episode: we will add a file
CONTRIBUTORS.md that lists the contributors of the project.
At the same time, our partner does the same in our repository, so we
will be both author and reviewer of a pull request.
Fork the repository
We don’t have write access to our partner’s repository: we can read it, but we can’t change it. So we work in our own copy of it on Codeberg, called a fork. The name comes from a “fork in the road”: once we make changes to our copy, the history of the project splits into two directions. With a pull request, we then ask our partner to pull our changes from the fork into their repository. They can review the changes and decide whether to accept them.
Go to
https://codeberg.org/some-researcher/my-git-repo-<partner>,
with some-researcher replaced by your partner’s username
and <partner> by their name, and click “Fork” in the
upper right part of the screen. Keep the name of the repository: as it
contains your partner’s name, it doesn’t clash with your own repository.
Click “Fork repository” to confirm.
Codeberg takes us to our fork:
https://codeberg.org/<your_codeberg_username>/my-git-repo-<partner>.
Below the repository name it says “forked from
some-researcher/my-git-repo-
Add a file on a new branch
It is good practice to make every contribution on its own
branch, named after what it does. That way,
main stays clean, and you can work on several contributions
at the same time. Codeberg can create the branch for us when we save our
change.
In our fork, we click “Add file” above the list of files and select
“New file”. We name the file CONTRIBUTORS.md and enter
something like:
MARKDOWN
# Contributors

The following people have contributed to this project:

- Some Researcher (owner)
- Conner Learner
with the names replaced by your partner’s name and your own.
All-caps file names
It is customary to give files with information about a
project a name in capital letters, so that they stand out in the list of
files. Examples are README, LICENSE,
CONTRIBUTING (how to contribute) or CITATION
(how to cite the project), often with a file extension such as
.md or .cff.
Below the editor, we enter the commit message “Add CONTRIBUTORS.md”.
Instead of committing directly to main, we select “Create a
new branch for this commit and start a pull request”, name the branch
add-contributors and click “Commit changes”.
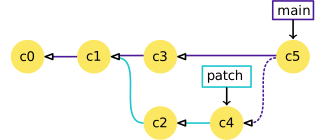
Branching and merging
Branches get their name because you can create a new one (say,
“patch”) that splits off from an existing one like “main”, allowing
different sets of changes to be made in parallel. Later on, Git can take
the changes from “patch” and merge them into the “main” branch. This is
exactly what will happen with our branch add-contributors
when the pull request is merged.
Open the pull request
Codeberg now takes us to the page for a new pull request. At the top, it shows which branches will be compared: the target (often called base) on the left, the source on the right. Check that the pull request goes
-
into the
mainbranch of your partner’s repository (some-researcher/my-git-repo-<partner>), -
from the
add-contributorsbranch of your fork (<your_codeberg_username>/my-git-repo-<partner>),
and change the selection if necessary.
Below, Codeberg shows the commits and the changes that will be part of the pull request. The title is filled in with our commit message. In the description, we explain what we did and link the pull request to the issue we opened in the previous episode. Use the number of your issue in your partner’s repository:
Closing issues automatically
If the description of a pull request (or a commit message in it)
contains a phrase like Closes #1, Fixes #1 or
Resolves #1, Codeberg links the pull request to issue
#1 and closes the issue automatically when the pull request
is merged. This saves a few clicks and makes sure that closing the issue
isn’t forgotten. It also documents why an issue was closed.
We click “Create pull request”. This takes us to the page of the pull request in our partner’s repository. It looks similar to an issue page, with a few extra tabs at the top:
- “Conversation”: the description and all comments,
- “Commits”: the commits that are part of the pull request,
- “Files changed”: the changes, shown as a diff like the
output of
git diff.
If we go to the issue in our partner’s repository, we can see that Codeberg has added a note there that the pull request references it.
Pull requests within a team
If you are a collaborator in a repository, you don’t need a fork: you
can create a branch directly in the shared repository and open a pull
request from that branch into main. Many teams work this
way, so that every change is reviewed by a second person before it
becomes part of main. In the repository settings under
“Branches”, you can even protect main, so that changes can
only get there through a pull request.
Review a pull request
Now we switch roles. Our partner has opened a pull request in our repository, and it’s our job to review it.
We go to our own my-git-repo-<name> repository,
click on the tab “Pull requests” and open the pull request from our
partner. Then we click on “Files changed” to see the changes.
When we hover over a line of the changes, a small +
button appears next to the line number. Clicking it opens a text field
to comment on this particular line. Let’s ask for a small change, for
example:
We click “Start review”. We could add more comments on other lines in the same way. When we’re done, we click “Finish review” at the top of the changes, choose “Request changes”, write a short summary and submit the review.
Reviews
Reviewing changes before they are merged is a common practice in software development (code review), but it is just as useful for documentation, metadata or data files: a second pair of eyes catches mistakes, and the discussion is saved together with the change. Comments on individual lines keep separate topics in separate discussions.
Update a pull request
Back in our role as author, we see the review on our pull request in our partner’s repository. To update a pull request, we don’t need to create a new one: we simply add a new commit to the same branch.
In our fork, we use the branch selector above the list of files to
switch to the branch add-contributors. We click on
CONTRIBUTORS.md and then on the pencil icon (“Edit file”),
and change our line, for example:
As commit message, we enter “Add link to Codeberg profile”. This
time, we keep “Commit directly to the add-contributors
branch” selected and click “Commit changes”.
If we reload the pull request page, we see the new commit in the conversation. We can answer the review comment, for example with “Done!”, and mark the conversation as resolved.
Merge the pull request
Switching roles a last time, we look at the updated pull request in our own repository. If we’re happy with the changes, we can approve them: click “Finish review” in the “Files changed” tab, choose “Approve” and submit.
At the bottom of the “Conversation” tab, Codeberg tells us whether the pull request can be merged without conflicts. We click the merge button (“Create merge commit”) and confirm.
Codeberg now creates a merge commit in our main branch.
If we open the linked issue, we see that it has been closed
automatically, with a note in its history pointing to the pull request
that closed it.
Finally, we update the repository on our own computer, so that it
contains the merged changes too. This is the same git pull
as in the episode Sharing your work:
OUTPUT
...
Fast-forward
 CONTRIBUTORS.md | 6 ++++++
 1 file changed, 6 insertions(+)
create mode 100644 CONTRIBUTORS.mdChallenge: The whole workflow
Draw the complete workflow of this episode on a sheet of paper or a
whiteboard, together with your partner. Include your partner’s
repository, your fork, the branch add-contributors, the
pull request and your own repository on your computer, and show with
arrows where the fork, the commits, the pull request, the merge and the
final git pull happen.
Challenge: When to use what?
You are working on a data project with two colleagues and want to suggest a change. In which of these situations would you use
- a commit directly to
main, - an issue,
- a pull request?
- You found a typo in the README of a public dataset from another institute.
- You noticed that some values in a data file look wrong, but you don’t know how to fix them.
- You want to add a new section to your team’s documentation, and the team has agreed to review all changes.
- You are the only person working on your own repository and want to save your progress.
- A pull request from a fork (or an issue, if you don’t want to make the change yourself): you don’t have write access to the repository.
- An issue: describe the problem, so that the people who know the data can investigate and fix it.
- A pull request from a branch in the shared repository, so that your colleagues can review it.
- A commit directly to
mainis fine – although a branch and a pull request can still help you to keep track of bigger changes.
- A pull request (on GitLab: merge request) suggests changes from one branch to another, often from a fork to the original repository
- Work on a new branch for each contribution
-
Closes #<number>in a pull request description closes the issue when the pull request is merged - Reviewers can comment on individual lines and approve or request changes
- New commits on the branch update the pull request