
Getting started with Git
Last updated on 2026-10-21 | Edit this page
Estimated time: 25 minutes
Overview
Questions
- What are repositories and how are they created?
- What do
addandcommitmean? - How do I check the status of my repository?
Objectives
- apply Git to turn a directory into a repository
- apply the two steps
addandcommitto record changes to files - apply
git statusto check the state of a repository - apply a README file as a method of documenting a project
Setting up Git
When we use Git on a new computer for the first time, we need to configure a few things. The basic elements of a configuration for Git are:
- your name and email address,
- what your preferred text editor is,
- the name of your default branch (branches are an important component of Git that we will cover later).
To start we will check in on our current Git configuration. Open your shell terminal window and type:
On MacOS, without any configuration your output might look like this:
OUTPUT
credential.helper=osxkeychain
init.defaultbranch=main
If you followed our instructions for installing Git for Windows, your output might look like this:
OUTPUT
diff.astextplain.textconv=astextplain
filter.lfs.clean=git-lfs clean -- %f
filter.lfs.smudge=git-lfs smudge -- %f
filter.lfs.process=git-lfs filter-process
filter.lfs.required=true
http.sslbackend=schannel
core.autocrlf=true
core.fscache=true
core.symlinks=true
core.editor=nano.exe
pull.rebase=false
credential.helper=manager
credential.https://dev.azure.com.usehttppath=true
init.defaultbranch=master
If you are using Linux or WSL 2 on Windows, you might not see any output at all.
If you have different output, then you may have your Git configured already. If you have not configured Git, we will do that together now. First, we will tell Git our user name and email.
Please note: Use the same email address in your Git configuration in
the shell as you entered into Codeberg when you created your Codeberg
account. Later in the lesson we will be using Codeberg, and it uses the
email address to link your commits to your account. Keep in mind that
the email address in your commits will be publicly visible once you
share them. If you are concerned about privacy, you can use the private
noreply address that Codeberg shows in your account
settings under “Account” instead.
Type these two commands into your shell, replacing
Your Name and the email address with your own:
BASH
$ git config --global user.name "Your Name"
$ git config --global user.email "yourname@domain.name"
If you enter the commands correctly, the shell will merely return a command prompt and no messages. To check your work, ask Git what your configuration is using the same command as above:
OUTPUT
user.name=Your Name
user.email=yourname@domain.name
Let’s also set our default text editor. A text editor is necessary with some of your Git work, and the default from Git is Vim, which is a text editor that is hard to learn at first. Therefore, we recommend setting a simpler text editor in your Git configuration for this lesson.
Text editors
There are a lot of text editors to choose from, and a lot of people are enthusiastic about their preferences.
Nano is a good choice because it works on Mac, Windows, and Linux; it runs directly in your shell; and has on-screen reminders of how to use it. If you followed our instructions for installing Git for Windows, it should already be your default editor.
Vi and Vim also run directly in the shell and have many powerful features, but are less beginner-friendly.
If you will be using Git or the Shell with a group of people for a project or for work, asking for recommendations or preferences can help you pick an editor to get started with. If you already have your favorite, then you can set it as your default editor with Git.
Any text editor can be made default by adding the correct file path
and command line options (see the Git
documentation). However, the simplest core.editor value
is "nano -w", which will run the Nano text editor directly
in your shell. To select it, type the following into your shell:
Lastly, we need to make sure the name of our default branch is set to
main, as that is what Codeberg and most other Git hosting
platforms use. To do this, type the following into your shell:
You may already have seen a setting for
init.defaultbranch when you looked at your configuration
earlier, overriding Git’s internal default. If your system configuration
sets the default branch to main, you don’t necessarily have
to set it again yourself, but doing so protects you from any
system-level changes.
Creating a repository
A Git repository is a data structure used to track
changes to a set of project files over time. Repositories are stored
within the same directory as these project files, in a hidden directory
called .git. We can create a new git repository either by
using Codeberg’s web
interface, or via the command line. Let’s use the command line to
create a git repository for the experiments that we’re going to do
today.
We will use the directory my-git-repo-<name> on
the Desktop that we created in the shell episodes. Let’s make sure we
are in it:
OUTPUT
/Users/riley/Desktop/my-git-repo-rileyThe ~ is a shortcut for your home directory, so this
command works no matter where you are at the moment.
Using Git
One of the main barriers to getting started with Git is understanding the terminology necessary to executing commands. Although some of the language used in Git aligns with common-use words in English, other terms are not so clear. The best way to learn Git terminology - which consists of a number of verbs such as add, commit and push (preceded by the word ‘git’) - is to use it, which is what we will be doing during this lesson. We will explain these commands as we proceed from setting up a new version-controlled project to publishing our own website.
On a command line interface, Git commands are written as
git verb options, where verb is what we
actually want to do and options is additional optional
information which may be needed for the verb. So let’s get
started with our setup.
We will now create an empty git repository to track changes to our project. To do this we will use the git init command, which is short for initialise.
OUTPUT
Initialized empty Git repository in /Users/riley/Desktop/my-git-repo-riley/.git/The my-git-repo-<name> directory is now a git
repository.
If we run the ls command now, we only see our
README.md; however, adding the -a flag for all
files via ls -a will show all hidden files, which in this
case includes the new hidden directory .git. Flags can be
thought of as command line options that can be added to shell
commands.
Note that whenever we use git via the command line, we need to
preface each command (or verb) with git, so that the
computer knows we are trying to get git to do something, rather than
some other program.
Displaying the current project’s status
We can run the git status command to display the current
state of a project. Let’s do that now.
OUTPUT
On branch main

No commits yet

Untracked files:
  (use "git add <file>..." to include in what will be committed)
	README.md

nothing added to commit but untracked files present (use "git add" to track)
The output tells us that we are on the main branch and that there are no commits yet.
Branches and commits
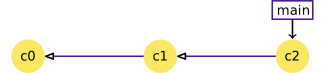
Commits in Git are like snapshots of our project. They are ordered into sequences, or “branches”, with each commit pointing back to the one before it in the branch. Git keeps track of the last commit in each branch with a special label; in this lesson we mostly use one branch with the label “main”.
Two steps: Adding and committing
We will now save our first project file, the README.md
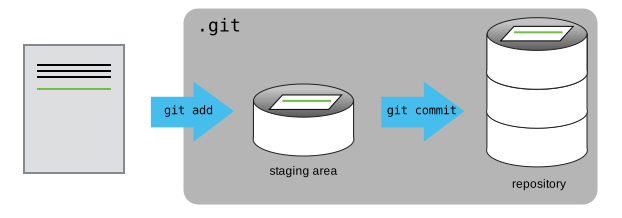
we created in the shell episodes, in the repository. This is a two-step
process. First, we add any files for which we want to
save the changes to a staging area, then we commit
those changes to the repository. This two-stage process gives us
fine-grained control over what should and should not be included in a
particular commit.
The status above is telling us that git has noticed a file in our
directory that we are not yet tracking (an untracked file).
With colourised output, the filename will appear in red. To change this,
and to tell Git we want to track any changes we make to
README.md, we use git add.
This adds our Markdown file to the staging area (the
area where git checks for file changes). To confirm this we want to use
git status again.
OUTPUT
On branch main

No commits yet

Changes to be committed:
  (use "git rm --cached <file>..." to unstage)

    new file:   README.md
If we are using colourised output, we will see that the filename has changed colour (from red to green). Git also tells us that there is a new file to be committed but, before we do that, let’s add some more text to the file.
We will open the file README.md with a text editor. If
you set Nano as your core.editor value, this would be a
good time to try it out:
If you don’t want to try Nano, use whatever text editor you feel comfortable with (e.g. Notepad on Windows or TextEdit on macOS) to open the file.
When you have the file open, you see the two lines we wrote with
echo. Add a third line, for example
Created in a Git and Codeberg workshop.. Then save the file
and close the text editor.
When showing how to edit README.md for the first time,
Nano is the most convenient editor to use – you don’t have to leave the
shell and it should work for everyone – but few learners will be fully
confident with it. Take them step-by-step through one of the two ways of
saving and closing the file:
- Ctrl + X to close the file; Y to save the file; Enter to keep the same filename.
- Ctrl + O to save the file; Enter to keep the same filename; Ctrl + X to close the file.
You could also keep a file manager window open (e.g. File Explorer, Finder, Files/Nautilus, Dolphin) to demonstrate locating the file and opening it in a suitable GUI text editor. Look out for learners who need help with this.
Now, let’s check if Git has spotted the changes:
OUTPUT
On branch main

No commits yet

Changes to be committed:
  (use "git rm --cached <file>..." to unstage)

	new file:   README.md

Changes not staged for commit:
  (use "git add <file>..." to update what will be committed)
  (use "git checkout -- <file>..." to discard changes in working directory)

	modified:   README.md
This lets us know that git has indeed spotted the changes to our file, but that it hasn’t yet staged them, so let’s add the new version of the file to the staging area.
Now we are ready to commit our first changes. Commit is similar to ‘saving’ a file to Git. However, compared to saving, a commit provides a lot more information about the changes we have made, and this information will remain visible to us later.
OUTPUT
[main (root-commit) e9e8fd3] Add README.md
 1 file changed, 3 insertions(+)
 create mode 100644 README.md
We can see that one file has changed and that we made three
insertions, which were the three lines of our README.md. We
can also see the commit message ‘Add README.md’, which we added by using
the -m flag after git commit. The commit
message is used to record a short, descriptive, and specific summary of
what we did to help us remember later on without having to look at the
actual changes. If we just run git commit without the
-m option, Git will launch Nano (or whatever other editor
we configured as core.editor) so that we can write a longer
message.
Having made a commit, we now have a permanent record of what was changed, and git has also recorded some additional metadata: who made the commit (you!) and when the commit was made (timestamp). You are building a mini-history of your process of working with the files in this directory.
More on the Staging Area
If you think of Git as taking snapshots of changes over the life of a
project, git add specifies what will go in a
snapshot (putting things in the staging area), and
git commit then actually takes the snapshot, and
makes a permanent record of it (as a commit). If you don’t have anything
staged when you type git commit, Git will prompt you to use
git commit -a or git commit --all, which is
kind of like gathering everyone to take a group photo! However,
it’s almost always better to explicitly add things to the staging area,
because you might commit changes you forgot you made. (Going back to the
group photo simile, you might get an extra with incomplete makeup
walking on the stage for the picture because you used -a!)
Try to stage things manually, or you might find yourself searching for
“git undo commit” more than you would like!
At the moment, our changes are only recorded locally, on our computer. If we wanted to work collaboratively with someone else they would have no way of seeing what we’ve done. We will fix that in the next episode by using Codeberg to share our work.
- When you initialize a Git repository in a directory, Git starts tracking the changes you make inside that directory.
- This tracking creates a history of the way the files have changed over time.
- Git uses a two-step process to record changes to your files. Changes to files must first be added to the staging area, then committed to the Git repository.